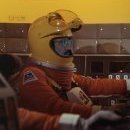
Jay Chladek Posted March 25, 2008 Share Posted March 25, 2008 I had a bad case of modelers burnout last year, brought about by a sleep deprivation effort to finish a Monogram 1/72 Space Shuttle model for a local museum. As such, I decided to relax with a build of a Tamiya F-117 Nighthawk in honor of the plane's 25 years of service and war veteran status. But I couldn't just do one as the scheme I wanted to do (Gray Dragon Air Superiority Gray scheme) was available in the Revell/Monogram kit. So I popped some currency down at the LHS for the Revell kit to scrounge the decals from. After reading about how the Revell kit is number 2 to Tamiya's number 1 effort, I decided to have a go at building both models side by side just to see how they really stack up against one another. Since both the decal options in the Revell kit are for the same plane at different times in its life, the Revell kit will represent the Dragon during its Desert Storm days while the Tamiya kit will be done as the Gray Dragon from 2004. Latest pictures of the Dragon before it got sent to Tonopah show that they got away from the two tone gray coloring as the plane seems to be just Dark Ghost Gray now. Both builds will be Out of the Box as much as possible. Work naturally began with the cockpits of both kits. Here is Tamiya's effort: And here is Revell's: Quote Link to post Share on other sites
Jay Chladek Posted March 25, 2008 Author Share Posted March 25, 2008 Comparing the two panels together, you can see how more accurate Tamiya's panel is compared to Revell's. Of course Tamiya did have five years more research to draw upon when they tooled up their kit in 1998 while Monogram tooled their kit up in 1991-92 and made a few educated guesses about the cockpit features on the F-117A. Tamiyas cockpit instrument decals layed down almost perfectly and sucked down just nice onto the instrument faces with a coating of Microsol. Revell's effort needed a bit of coaxing and a bit of cutting and shaping as its decal doesn't match the features on the panel too well at all. The general layout of the instruments doesn't look too accurate either. But since this is an OOB build, I opted to come up with just something that looked okay and left it at that. Raised details on the panels and side consoles of both cockpits were picked out with Prismacolor colored pencils. A couple drops of yellow and red paint were also needed in spots. Tomorrow I hope to have the cockpits in the fuselages as my gear well and weapons bay paintwork is almost done. Then things will hopefully progress a little quicker as I work to getting the models ready for the paint stage. Quote Link to post Share on other sites
rom Posted March 25, 2008 Share Posted March 25, 2008 HI! good to see nighthawks! see mine : http://www.arcforums.com/forums/air/index....mp;hl=nighthawk report : http://fighters.forumactif.com/vos-montage...?highlight=f117 bye and keep the pics coming! Quote Link to post Share on other sites
Phartycr0c Posted March 25, 2008 Share Posted March 25, 2008 mmmmm the 117! watching this carefully keep the shots coming. I wish i was brave enough to have a go at the Testors 1 32 offering. I've never seen one done. very relavent in their last year. Quote Link to post Share on other sites
rjwood_uk Posted March 25, 2008 Share Posted March 25, 2008 also going to be watching this one!!! getting the tam effort soon, looking forward to filling in the pannel lines! i know your doing it OOB but are you going to do that? nice work on the cockpits and consoles so far! Richard Quote Link to post Share on other sites
Aggressor Supporter Posted March 25, 2008 Share Posted March 25, 2008 Nice cockpits! Looking forward to seeing more of these Nighthawks. Quote Link to post Share on other sites
Jay Chladek Posted March 26, 2008 Author Share Posted March 26, 2008 Thanks guys. First off, nice Nighthawk there rom. I am going to be checking it over closely to see how you did the weapons bay. As for the panel lines on the Tamiya kit, yes I plan to tackle them using Gunze Mr. Dissolved Putty as my filler of choice. I'll keep you posted on my efforts. If all goes well, tonight I might be able to get the fuselage build work done on the Revell kit. The Tamiya kit will take a little longer due to the stuff I need to get done in the gear and weapons bays first. I've got them painted white and gave them a light coating of smoke wash to pop out some of the shaded details. But I still need to add a few things in the weapons bay and I also need to do some gear strut work as well since it seems as though I need to build up part of the nose gear on the Tamiya kit before I get the body together. Otherwise it might be a pain to get the nose gear in afterwards. Film at eleven. Quote Link to post Share on other sites
ChernayaAkula Posted March 26, 2008 Share Posted March 26, 2008 (edited) Nice idea to compare the kits side by side. I was always a bit sceptic regarding IP decals, but that looks amazing. I have the Revell kit lying half-assembled in a corner of my room. Need to finish it one day. Edited March 26, 2008 by ChernayaAkula Quote Link to post Share on other sites
Aarzee Posted March 26, 2008 Share Posted March 26, 2008 Looking great so far ! Looking forward to more pics ! Quote Link to post Share on other sites
habu2 Posted March 26, 2008 Share Posted March 26, 2008 I must say I like these side-by-side builds we've been seeing lately. I may have missed a few but just this year we've seen: F-117 F-14 F-16 F/A-18 any more? Quote Link to post Share on other sites
Jay Chladek Posted March 28, 2008 Author Share Posted March 28, 2008 Okay, tomorrow I hope to have more pics up. Yesterday and today it has just been grunt work in the gear bays to get these models ready to have their interiors sealed up and the seam cleanup done for paint work. Right now, I've got the wings on the Revell kit and the gear bays are done. So I just need to let some glued areas dry overnight before I stick the upper fuselage on it. The Tamiya kit is going a little more slowly due to the work needed in the weapons bay and the gear bays before I can close up its fuselage. In the mean time, here are a few things I have come across so far: Revell: The kit has peacetime navigation lights on the fuselage as an option. These were only mounted for peacetime flights as the red gumballs came off for fangs out missions. Since I am doing my Revell kit as 835 from Desert Storm, the gumballs are coming off. If you do use the lights on your model, be sure to round them as they are much more rounded then the straight siren light type look that Revell went for. Plus they need to be tinted red anyway. If you plan to drop the flap/elevons on the model, be aware there are two gaps in the back of the model that you can see daylight through. So you need to plate these over. In my case, I just glued the control surfaces in the flush up position. I may drop the control surfaces on the Tamiya kit, but I haven't decided for certain yet. Tamiya: Not much to report. The weapons bay is nice, but has no sidewall detail at all. Granted one may not see much when the bomb racks are added, but I would say if you plan to do something more then an OOB build of an F-117 with an open bomb bay, expect to do some work on the sidewalls. The Tamiya kit does NOT have fuselage nav lights onboard, just the wingtip lights. So although they give you the reflector panels, you are on your own for the lights. In my case, I am doing up Gray Dragon without lights anyway as it was used for weapons testing at Nellis and presumeably these took place in close to actual combat conditions (i.e. full stealth capability, no compromises). In Conclusion (for the moment) Thus far I am having fun with both kits and it is interesting to see how each company approached this subject. One thing I am a little concerned about are some seams I have to deal with on the bottom of the Revell effort where the wings join the fuselage. The challenge will be to fill the seam and then sand it to make it look like a seam in the RAM. That is going to require some careful sanding. It is looking more and more like an F-117 at least. Quote Link to post Share on other sites
rom Posted March 28, 2008 Share Posted March 28, 2008 keep the good job! Quote Link to post Share on other sites
David Walker Posted March 29, 2008 Share Posted March 29, 2008 I'll look forward to watching your progress as I have a Tamiya F-117 that I'd like to get to soon. Quote Link to post Share on other sites
rjwood_uk Posted April 2, 2008 Share Posted April 2, 2008 any updates Jay? hows it comming along? Richard Quote Link to post Share on other sites
Jay Chladek Posted April 7, 2008 Author Share Posted April 7, 2008 Okay, I have some more pictures. First of all both the Revell and Tamiya kits have their fuselages and wings assembled. The Revell kit's body was assembled first, mainly because it doesn't have a weapons bay like the Tamiya kit. There are some rather wicked looking seams on the bottom though where the wings mate with the fuselage. So I am not looking foreward to filling those all that much. I've spent most of my work during the past week on the Tamiya kit and I will be diverting most of my efforts to getting this one done as there is a model contest in Des Moines, IA next weekend that I want to finish it for. Of course I've already spent a lot of time on it as I really really HATE painting gloss white over black plastic. Tamiya provides one parts sprue in white plastic, but only the bomb cradles are on it. The bay and the center divider are molded in black. But after more then a few passes with the gloss white, a wash of Tamiya smoke in the bay and on the cradle pieces, along with some brushed small bottle Testors silver for the chromed door and cradle actuators, I think the result looks okay: After getting the body together, I next decided to focus on filling some of the panel lines. The RAM coverings on the F-117 for the most part cover up any body panels, except for the occassional access or antenna door on top and bottom. I guess Tamiya shot pictures of the YF-117 at the Air Force museum (which had its RAM coverings stripped and the bare fuselage painted black) and thought the panels were in the RAM. For my filler material, I am using Gunze Mr. Dissolved Putty. It is a product similar to Mr. Surfacer in that it can be painted on. But unlike Mr. Surfacer, this stuff fills bigger gaps. I painted it onto pretty much all the panels I wanted to fill, taking care not to cover up every panel as some I wanted to keep. After letting it dry for a few hours, I then dry sanded the model with 220 grit, being careful not to round any of the sharp edges of the plane. To help with this, in tight spots I applied Tamiya masking tape as a guide/protector to cover the panels I didn't want to sand over. When a panel was sanded, I pulled the tape off and reapplied in another area. Tape was also used to cover over the nav lights, the cockpit opening and the DLIR and FLIR bay windows to keep dust out and lessen the chance of accidentally nicking one with sandpaper. In almost no time, I was finished sanding out the excess and ended up with some nice crisp filled panel lines. See below. Here are the panels on the bottom after painting on the Dissolved Putty with a tiny brush to avoid painting too much excess (tedious, but easy to do). Here are some of the lines sanded on the spine of the plane while the panels on the wings are still just painted on (and still drying as I did these after I liked the appearance of the spine panels). Here are the panels on the bottom after sanding. There are some small gaps in the filling, but I can fill these in easily enough and primer might also help to cover them up as well. The Mr. Dissolved Putty also worked well for the main upper and lower body seam as there was a slight step between the two pieces that I had to deal with. Thus far, I am having fun. The gear struts on both planes are also painted, although the Monogram struts need a little more detail painting for some molded on brake lines. I won't shoot pictures of the struts until I finish the tires and add them to the struts. Right now I am working on the tail surfaces of the Tamiya kit as I am mainly trying to get it done for the contest. I have about five days, so hopefully I will succeed. Quote Link to post Share on other sites
TomcatFanatic123 Posted April 7, 2008 Share Posted April 7, 2008 Well, Jay, I'm watchin' this one closely. The Tamiya Nighthawk is up next on my build list . Beautiful work so far. Quote Link to post Share on other sites
Aggressor Supporter Posted April 8, 2008 Share Posted April 8, 2008 The weapons bay looks pretty neat. Quote Link to post Share on other sites
Jay Chladek Posted April 9, 2008 Author Share Posted April 9, 2008 The bay indeed looks neat. But if I ever do another open bay on a Tamiya kit, I will probably try to locate some aftermarket or do some scratchbuilding as the outer side walls are pretty bare of detail when the 117 bay looks very detail heavy, going by the Squadron Walkaround book. The center divider and weapons cradles look cool though. I do wish Tamiya hadn't gone for a one piece bay personally. If they had molded the walls separate, then they could have made them detail heavy and I don't think it would have added too much to the price of what was already an expensive kit when it came out. Next update will have more photos as I should be in the primer stage very soon. Right now I am just finishing up some of the tedious bits and doing some final filling and sanding in spots. Plus, if it is one thing I really hate about this kit, it is the frigging number of tiny ejector pin marks on the doors! I didn't really do anything with the ones in the gear bays, but I did try to reduce the ones on the gear doors and I just need to sand down the filled ones on the weapons bay doors before I paint them either tonight or tomorrow. Film at eleven. ;) As for the Revell kit, I got the tail fins assembled last night and the nose installed. I am not prioritizing on this one though as I want to finish the Tamiya model first, since it has the potential to look really stunning at an upcoming model show this weekend. Wish me luck! Quote Link to post Share on other sites
rjwood_uk Posted April 9, 2008 Share Posted April 9, 2008 very nice job mate!!! i also hate painting gloss white over black plastic...and red, and yellow lol. great work on the pannel lines. very neat and tidy. looks like you havnt missed any bit at all! ;) looking forward to seeing the next progress pics. Richard Quote Link to post Share on other sites
Aggressor Supporter Posted April 9, 2008 Share Posted April 9, 2008 The bay indeed looks neat. But if I ever do another open bay on a Tamiya kit, I will probably try to locate some aftermarket or do some scratchbuilding as the outer side walls are pretty bare of detail when the 117 bay looks very detail heavy, going by the Squadron Walkaround book. The center divider and weapons cradles look cool though. I do wish Tamiya hadn't gone for a one piece bay personally. If they had molded the walls separate, then they could have made them detail heavy and I don't think it would have added too much to the price of what was already an expensive kit when it came out. That's good information Jay. The F-117 is on my list. How is the Revell kit in comparison so far? Quote Link to post Share on other sites
Jay Chladek Posted April 10, 2008 Author Share Posted April 10, 2008 That's good information Jay. The F-117 is on my list. How is the Revell kit in comparison so far? Well, the Revell kit IMHO is not bad, but it isn't Tamiya either. The cockpit is the big shortcoming as when Monogram tooled it up back in 1991, they didn't have much data on the pit and made some guesses. Some things they guessed right at, others, not so much. The instrument panel itself is off and the pit is too shallow from front to back, although the height looks right. So best use for the stock pit is canopy closed. General shape and proportions look right, but the main fuselage on this plane is a little longer then the Tamiya kit although the wingspans are the same. The gear looks okay, although again the gear bays are best guesses with available data at the time (the nose gear bay being the worst offender). The only real mod I see that needs to be made for accuracy are the tails as Monogram didn't flatten the tops right. So the tails should be flat relative to the horizontal plane rather then relative to the tail fins themselves. I am also not looking foreward to filling and sanding the leading edge wing and fuselage seams as the wings are a little more blunt then they should be (due to the way the wings were molded and the glue edges) and the seam splits on the upper and lower fuselages aren't the greatest with a few gaps here and there. My example also has a slight shift to one side in the tail area and I made sure to align it properly when I built it, so I am not entirely sure what caused it. But when all is complete, I doubt it will be that noticeable. The one main thing I really don't like about the Revell kit is the bright yellow clear parts, intended to represent the gold tinting on the canopy. Tamiya only went with an ever so slight tint and this is probably proper. As such, it might be best to source an early Monogram 117 kit with the photoetch as the clear parts tree in that kit is clear. The Promodeler offering with the weapons bay might also be worth considering, but again it is probably a best guess while Tamiya's (even with a lack of sidewall detail) looks accurate for the items they represent. Quote Link to post Share on other sites
Aggressor Supporter Posted April 10, 2008 Share Posted April 10, 2008 Thanks Jay for the feedback. Good information. Quote Link to post Share on other sites
Jay Chladek Posted April 11, 2008 Author Share Posted April 11, 2008 Minor Update: I don't know if I will be done by Saturday, but I am in the home stretch. The gray primer coat is drying on the Tamiya model as I type this and I am working on some of the secondary items for the model (gear tires, bays, doors, bombs). I will get some photos uploaded somewhat soon. I look at this model and one thing that strikes me as odd about it is the lack of screened areas on top except for the intakes. I have a sneaking suspicion that Tamiya had plans to issue a photo etch set for this kit, but they probably changed their minds after the less then favourable response they got when they tried the same tactic with the Swordfish kit. This could also explain why the side walls of the bomb bay are also featureless as photoetched details could have worked well here. I like the clear parts masks that Tamiya provides as they are essentially made out of Tamiya masking tape. I taped the sheet to a flat surface and used a hobby knife and a straight edge to make the appropriate cuts, which works perfectly considering all the clear bits have no curves on them. They also seem to fit the model nicely. Of course I won't know how well they worked until I finish painting the model and pull all the masks off. So it is something of a leap of faith. They should do the job though. Quote Link to post Share on other sites
TomcatFanatic123 Posted April 12, 2008 Share Posted April 12, 2008 (edited) ...Of course I won't know how well they worked until I finish painting the model and pull all the masks off. So it is something of a leap of faith. They should do the job though. How long can you leave those masks on before they start leaving residue on the clear parts? I'm about 2 weeks or so away from shooting paint on mine, so is it too early to go ahead and mask, say, the FLIR and DLIR windows so I don't accidentally deposit a nice big CA glue fingerprint right in the middle of them? Edited April 12, 2008 by TomcatFanatic123 Quote Link to post Share on other sites
Jay Chladek Posted April 12, 2008 Author Share Posted April 12, 2008 I've left Tamiya tape on parts for at least a month without a residue problem. So if these masks are indeed the same stuff (as they seem to be), then you should be fine. Tamiya tape is pretty much the ONLY stuff I mask with these days as it is the perfect stuff for model use IMHO. As for the FLIR and DLIR windows, rather then using the paint masks, just get some normal Tamiya tape and put a piece on there for the duration of the filling and sanding steps. Glue wasn't so much a concern with me, but I was worried about accidentally hitting one of these with a sanding stick. So the tape provides a nice barrier against damage. This also meant I didn't need to use the provided tape masks until right before it was time to primer and paint. Quote Link to post Share on other sites

Recommended Posts
Join the conversation
You can post now and register later. If you have an account, sign in now to post with your account.