haneto Posted December 2, 2006 Share Posted December 2, 2006 Hi,guys!Carry on with my 1/72 MiG collection! This time comes a "Farmer". I used Bilek kit,the only 1/72 P/PM kit on the market,with Extratech PE set. The kit has fine panel lines and details on wheel are not so bad. But just pay attention to the nose and cockpit——it's quite hard to assemble. So I had to use some plastic sheet to increase the thickness. I also scratch-built the landing gear bay,which seemed not deep enough for me. Gear covers made in PE parts. The missiles are compared after PE detailing. To be continued... Yufei [/img] Quote Link to post Share on other sites
Albert Moore Posted December 2, 2006 Share Posted December 2, 2006 Go Yufie go! I'm sure this will be another exercise in 1/72 scale master craftsmanship. I look forward to the finished Mig. Cheers, Alby Quote Link to post Share on other sites
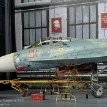
haneto Posted December 10, 2006 Author Share Posted December 10, 2006 Hello,guys!New Progress 4 RS-2US “Alkali†missiles: Fuel tank: Main gears.Original kit part as below: After careful sanding and piping: Front gear.Once again,original kit part as below: I cut the part into two and add the brass rod as the hydraulic pod. With pipes made of 0.1mm/0.2mm brass lines. Quote Link to post Share on other sites
haneto Posted December 10, 2006 Author Share Posted December 10, 2006 Still need careful shape-took sanding.I felt myself making a master...... :blink: Any way,the Bilek Farmer kit only "looks" nice,but very hard to deal with——if you wanna get a correct looked MiG-19. If you want to make an S,maybe Kopro/KP kit with raised lines and rivets will be better. To be continued. Yufei Quote Link to post Share on other sites
geedubelyer Posted December 10, 2006 Share Posted December 10, 2006 Marvellous work Haneto, especially in 1/72nd scale. This looks like it will be another beauty! :D Quote Link to post Share on other sites
Frank Steffens Posted December 10, 2006 Share Posted December 10, 2006 Great work so far Haneto, can't wait to see it finished! Quote Link to post Share on other sites
DFN Posted December 10, 2006 Share Posted December 10, 2006 Whaouh !! I wait to receive mine from Hobbyshop and your building will be a reference !! Quote Link to post Share on other sites
Arseny Posted December 10, 2006 Share Posted December 10, 2006 you're the Man, Yufei! I really admire modellers who are confident and skillful enough to make such modifications you show. Respect! Quote Link to post Share on other sites
thegoodsgt Posted December 10, 2006 Share Posted December 10, 2006 Awesome work, Haneto. Can you explain how you attach the fins to the armament? Every time I do that, I get an ugly blob of glue that runs down the length of the fin, where it attaches to the body of the armament itself. I suspect it has to do with controlling the amount and placement of the glue...? Quote Link to post Share on other sites
haneto Posted December 11, 2006 Author Share Posted December 11, 2006 Thank you for your encouragement,guys! Though still a lot of work to do. :huh: Can you explain how you attach the fins to the armament? Every time I do that, I get an ugly blob of glue that runs down the length of the fin, where it attaches to the body of the armament itself. I suspect it has to do with controlling the amount and placement of the glue...? Well,after cutting the plastic fins,there should leave some marks on the position. I usually use 0.2mm drills to make holes to be the assembling marks. 2 holes 1 fin on the missile. And I'd suggest you to try superglue Gel type.(I even use it instead of putty because of its hardness after drying) Hope that'll help. Quote Link to post Share on other sites
DFN Posted December 23, 2006 Share Posted December 23, 2006 Hi haneto, It's hard to wait for your update.....Don't forget us Quote Link to post Share on other sites
haneto Posted December 24, 2006 Author Share Posted December 24, 2006 Hello,guys! It's already Christmas Eve here and Merry Christmas to all of you! ;) Here comes a dozen of updates and here we go! I replaced the rod of APU pylon by plastic rods,with 0.2mm brass rod in it for strengthen. Rescribing all the hatches,with rivets. As you can see,most hatched are close to the back of Farmer so the scrbing ruller cannot be used...... I had to scribe them without and tools,controlling my fingers and concentration! Wing blades are replaced by PE part. Some panel lines on the stabs are wrong.Fill them by super glue and rescribe after sanding. The panel lines and hatches dissapeared thoroughly after hard sanding,so I had to add them all. The head of fuselage......that S**Ks! I applied plenty of plastic cards,and hundred times sanding,filling super glue,sanding...... Pitot tube replaced by brass rod with 0.2mm stainless rod inside. As I chose to close the canopy,I didn't put too much time detailing the cockpit. The progress untill this noon. Quote Link to post Share on other sites
haneto Posted December 24, 2006 Author Share Posted December 24, 2006 Go on! Exhausts.....really hard to scroll these PE parts,man......what's more,I had to make the pipe by plastic cards. :blink: The canopy!!! Yes,the kit canopy is thoroughly WRONG in shape! Look at this plan: And the kit part——no way!Too high and wrong angel of windscreen! So I had not choice but using Pavla Models vacuum canopy. The vacuum one is for KP kit and nevertherless much better than the kit part. But still need MODIFICATON! You can never be careful enough while dealing with vacuum things. Sanding,dry-fitting,sanding,again dry fitting......that was TIRING! :huh: Don't forget the hatch on the canopy. Well,finally......it looks like the thing. With cockpit interior colour sprayed. : Quote Link to post Share on other sites
haneto Posted December 24, 2006 Author Share Posted December 24, 2006 Farmer's ready for painting! MiG-19 has just so many intakes! Different type and size...... It's really a suffer to fight with a tough model in Christmas Eve,ALONE...... :unsure Quote Link to post Share on other sites
haneto Posted December 24, 2006 Author Share Posted December 24, 2006 And now here's the Chrismas Present for all of you guys! As many one asked me the method of making some intakes,I'll show the tip here step by step. :blink: Got youself a plastic rod with proper size. Sand it like this: Cut for the intake length.Drill a hole on that side,with driller from 0.2mm,then 0.4,then 0.6...... From small size to big one. Then put the part on your desk,hold it with your needle by your left hand,and cut it into half by your design knife in your right hand. Got it! :D You can also make many different shape parts by this methods. That's all.Do you like my Christmas gift? :huh: Hope I can finish it in 2006! Yufei Quote Link to post Share on other sites
flyingaxe Posted December 24, 2006 Share Posted December 24, 2006 Very clever indeed Thanks for sharing. :blink: Claudio Quote Link to post Share on other sites
Bennygmanuk Posted December 24, 2006 Share Posted December 24, 2006 Great work Yufei - and a great tip on the intakes. Steve. Quote Link to post Share on other sites
haneto Posted January 3, 2007 Author Share Posted January 3, 2007 Wow,guys!My first topic in 2007 and happy new year! :D As you know,the cable lines were damaged because of the earth quake near Taiwan Island,it has been very very difficult to access the websites outside China mainland,especially USA and Europe. Now it seems the cables have been recovered partly and I managed to upload some pics to my web albumn,at last. Auxiliary pressure probe. Camera. Fairing of landing gear covers. Position indicator. UHF radio. Exhausts installed.This procesure cost a lot of time for sanding and dry-fitting. During painting,I found the 2 intakas on the back were wrong.So I remade 2. IFF. Postion lights are made by clear sprues.After assembling,apply masking zoe. Quote Link to post Share on other sites
haneto Posted January 3, 2007 Author Share Posted January 3, 2007 Painting finished.But after taking the masking tape,I found the canopy got smoke inside,maybe I used too much super glue. So I had to release the canopy and sand it from inside by polishing powder. I used Tamiya weathering tools for weathering. This one is magnificant!Highly recommend! I made a ladder by 0.35mm brass rods.And it is the real thing. First of all,find a flat platform.Apply a piece of 2 sides tape and then apply the masking tape on it. The other masking paper around it are the "molds" for positing the ladder parts. The stickness of 2 sides paper is so strong that ladder may be destroyed during releasing,so I used masking tape. Here is the ladder. While releasing it,I used a razor blade as it's thin enough and tender. Apply the rubber plate by plastic rod slices. Finished.The wheel stops are PE parts from Flighpath. Quote Link to post Share on other sites
haneto Posted January 3, 2007 Author Share Posted January 3, 2007 The whole plane finished.I'll find another day for photographing.(It's raining heavily here this week.) Hope you like it! :D Yufei Quote Link to post Share on other sites
tiger331 Posted January 3, 2007 Share Posted January 3, 2007 It is really excellent work done on this not very perfect model. And it is very nice to see model done in Czech AF colours at such distant country. THANKS Quote Link to post Share on other sites
Laurent Posted January 3, 2007 Share Posted January 3, 2007 Excellent ! I love this Czech marking. ;) Quote Link to post Share on other sites
Bullet101 Posted January 3, 2007 Share Posted January 3, 2007 Wow, amazing work Quote Link to post Share on other sites
Tancist Posted January 4, 2007 Share Posted January 4, 2007 Yufey, that's really cool! Wonderful MiG! :D Quote Link to post Share on other sites
Arseny Posted January 4, 2007 Share Posted January 4, 2007 respect! this one is the best model I've seen this year! =] Quote Link to post Share on other sites

Recommended Posts
Join the conversation
You can post now and register later. If you have an account, sign in now to post with your account.