Sebastijan Posted February 6, 2010 Share Posted February 6, 2010 (edited) So I decided to make a dash for it and try to finish my second entry by the end of the month. With so much fuzz around PAK-FA these days, I decided I'll build MiG's 5th gen technology demonstrator, the MiG 1.44, especially after I've seen it in person with Zmey at MAKS 2009. not much to show for now, just the front part of the plane assembled and I am building the main fuselage now... Edited February 27, 2010 by Sebastijan Quote Link to post Share on other sites
Sebastijan Posted February 8, 2010 Author Share Posted February 8, 2010 a quick dryfit of the main components... Luckily I don't see any major problems during the main construction... and a size comparison with its older sister Quote Link to post Share on other sites
mig21gato Posted February 8, 2010 Share Posted February 8, 2010 Hi Sebastijan,MiG I.44 as a great choice,its a beautifull MiG. Look very nice Cheers. Quote Link to post Share on other sites
Raymond Posted February 9, 2010 Share Posted February 9, 2010 sweeeet :lol: was tempted to do a 144 after pak-fa aswel! Quote Link to post Share on other sites
musangpulut Posted February 9, 2010 Share Posted February 9, 2010 really nice! and I love your photo setup! Lighting is just enough and subtle.If you dont mind,can you share how you set up the model for the photo shoot? Quote Link to post Share on other sites
Sebastijan Posted February 9, 2010 Author Share Posted February 9, 2010 Thanks guys! photo setup: basically really simple. a large cardboard box from an old TV I think, cut to have 3 holes (sides and top) that are covered with transparent paper to difuse the light and the front cut to the bottom of the box to act as front "door"... the paper inside is interchangable; swithced to white now as this is SAM's new policy and I think it looks very classy this way. There are two lamps visible on the photo, one from the top and one from the side, but I usually use one for each of the holes with the 4th one handheld from the front, to lighten up and soften the shadows. With the setup complete, I manually measured the white balance inside the box with a piece of white plastic and saved it for future use. Camera settings: Camera mounted on a tripod, Aperture mode (A-Nikon, Ta - Canon) f20 or more, focal length 50mm or more, manual exposure compensation EV+0.7, ISO100. Quote Link to post Share on other sites
Berkut Posted February 9, 2010 Share Posted February 9, 2010 Looking forward to more. Always liked 1.44. Quote Link to post Share on other sites
janman Posted February 9, 2010 Share Posted February 9, 2010 I like your studio! Quote Link to post Share on other sites
musangpulut Posted February 9, 2010 Share Posted February 9, 2010 Many thanks for sharing the photo shoot tips! really helpful! :} Quote Link to post Share on other sites
pkrasna Posted February 12, 2010 Share Posted February 12, 2010 Niceeeeeee! Have you figured out how the cockpit looks on the real one? Are there any photos? Primož Quote Link to post Share on other sites
Sebastijan Posted February 13, 2010 Author Share Posted February 13, 2010 negative, no photos of the real one... Quote Link to post Share on other sites
Sebastijan Posted February 16, 2010 Author Share Posted February 16, 2010 All main components together... I'll add some details now and off to primer. I don't know if I'll be able to finish this baby before the deadline, cause I don't have the AB where I live... But I'll try to do my best! Quote Link to post Share on other sites
dragan_mig31 Posted February 16, 2010 Share Posted February 16, 2010 this looks verry nice.can't wait to see the painting Quote Link to post Share on other sites
Sebastijan Posted February 22, 2010 Author Share Posted February 22, 2010 No pics at this time, but the model is painted and I am applying several layers of Future at the moment. I'll decal her tomorrow and make a slight panelwash the day after - if nothing tragic happens, she'll be finished before the deadline... Oh, I'll post pics whn she's finished... Quote Link to post Share on other sites
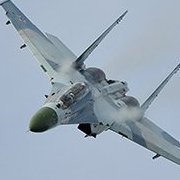
Sebastijan Posted February 27, 2010 Author Share Posted February 27, 2010 She's finished! Quote Link to post Share on other sites
dragan_mig31 Posted February 27, 2010 Share Posted February 27, 2010 great looking mig.i love the finishing look. Quote Link to post Share on other sites
POWERSLAVE Posted February 27, 2010 Share Posted February 27, 2010 Lovely - jovly work!!! Mine is still in stash... :unsure: Quote Link to post Share on other sites
HOLMES Posted February 27, 2010 Share Posted February 27, 2010 (edited) She's finished! MY FAVORITE shot of this STUNNING MiG.. now all you need to do is some photoshopping and it will LOOK MORE AWESOME !! Edited February 27, 2010 by HOLMES Quote Link to post Share on other sites
Sebastijan Posted February 27, 2010 Author Share Posted February 27, 2010 now all you need to do is some photoshopping and it will LOOK MORE AWESOME !! what exactly do you have in mind? Quote Link to post Share on other sites
HOLMES Posted February 27, 2010 Share Posted February 27, 2010 No offence was intended but I was just looking at another persons and they photoshopped some scenery like mountaines as their model "flew" over them...it was just a thopught..it looked SO AWESOME as it is..I was thinking out loud ..sorry Quote Link to post Share on other sites
Sebastijan Posted February 28, 2010 Author Share Posted February 28, 2010 hey no offense taken... I did similar thing a couple of months ago with a model of Su-47 Berkut attached in-flight to a framed mountain photo - and from some angles you don't see the supporting rods... I am not in the mood for playing with PS though - I rather model 3D Quote Link to post Share on other sites
davetur Posted February 28, 2010 Share Posted February 28, 2010 Very neatly done! Really nice. Cheers Davide Quote Link to post Share on other sites
Berkut Posted March 1, 2010 Share Posted March 1, 2010 She is a beaut indeed! (in two ways! ) Quote Link to post Share on other sites
Mike C Posted April 30, 2010 Share Posted April 30, 2010 I've just come across this thread..... What's the fit like? Did you have to use any putty at all? I'm tempted to buy this.... Would look even more awesome in "what if" arctic camo..... Quote Link to post Share on other sites
Sebastijan Posted April 30, 2010 Author Share Posted April 30, 2010 only a small amount of putty was needed on some joints... not bad for such a large model... Quote Link to post Share on other sites

Recommended Posts
Join the conversation
You can post now and register later. If you have an account, sign in now to post with your account.