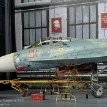
haneto Posted August 25, 2006 Share Posted August 25, 2006 Hi,Guys!I'm back with some progress pics of my latest MiG! :blink: I used Zvezda kit,Part PE sets and the great decal from Begemot! The panel lines on the kit is really deep and wide——like a CANAL...... And the edge of the fins and wings is just THICK!So I started my work from sanding the edge. Wings.Before sanding: After: So is the intake: Fins,after sanding: The DEEP panel lines disappeared after sanding——now you can see how thick the edge is...... Almost everything needs sanding and I spent a whole week spare time doing that. The holes needs filling. The blade will be replaced by the PE part. In order to increase the strength,I used a needle top here. Quote Link to post Share on other sites
haneto Posted August 25, 2006 Author Share Posted August 25, 2006 The canopies don't fit each other well.After some dry-fits,I found the windscreen is too low and the first canopy flame is too thin. So I use plastic sheet to increase the height and length.After sanding,polyshing is needed. OK.Then it looks they fit each other at last. To be continued... Quote Link to post Share on other sites
PapaSmurf630 Posted August 25, 2006 Share Posted August 25, 2006 Awesome...this is going to be kick *** Quote Link to post Share on other sites
geedubelyer Posted August 25, 2006 Share Posted August 25, 2006 Hi Haneto, You have made a terrific start on this MIG. If it turns out as well as the Sniper '-29 it will be superb. You are very thorough. The work you are putting in should improve the look of the kit immensely. Keep up the great work. Quote Link to post Share on other sites
MaRiO FDZ Posted August 25, 2006 Share Posted August 25, 2006 Nice work so far man Take Care! Quote Link to post Share on other sites
Laurent Posted August 25, 2006 Share Posted August 25, 2006 Very good start ! Quote Link to post Share on other sites
Berkut Posted August 25, 2006 Share Posted August 25, 2006 Please! Can you make 374 version?!!! Quote Link to post Share on other sites
afterburner Posted August 25, 2006 Share Posted August 25, 2006 haneto- I love watching your builds. It's amazing what you can do to 1/72. I can't wait for more progress! Quote Link to post Share on other sites
dknights Posted August 29, 2006 Share Posted August 29, 2006 The Zvezda kit is very basic. You have real talent to turn it into a beautiful model. I cannot wait to see it. Quote Link to post Share on other sites
virsago_mk2 Posted August 29, 2006 Share Posted August 29, 2006 Nice one. I'm about to buy the same kit as well but I'm not sure about the quality. Now I know what do & what not to do. Thanx a lot haneto Quote Link to post Share on other sites
AnthonyWan Posted August 29, 2006 Share Posted August 29, 2006 (edited) Looking foward to seeing more pictures of your fantastic 1/72 build Heard this one has plenty of fit problems Edited August 29, 2006 by AnthonyWan Quote Link to post Share on other sites
Andrew D. the Jolly Rogers guy Posted August 29, 2006 Share Posted August 29, 2006 JEEZ but I love Foxhounds.... Quote Link to post Share on other sites
janman Posted August 29, 2006 Share Posted August 29, 2006 Heard this one has plenty of fit problems ;) I wouldn't say that. It was actually a rather nice kit to build. A bit of putty is needed, but even more test fitting and use of your own brains, when planning the assembly process. Nice kit from Zvezda, not perfect, but looks like a Foxhound in all respects. Quote Link to post Share on other sites
haneto Posted August 30, 2006 Author Share Posted August 30, 2006 Thank you for the nice comments,fellows! I didn't get much time last week so I decided to start with wings instead of cockpit. After watching the photos of a real Foxhound,I found the top line of canopy is almost straight. (Sorry for editting the folowing original photos collected from the web,especially to Flankerman:)) But the line of Zvezda canopies looks a little round,so I sanded them,especially the last part of canopy——two lines should be removed to even flat. And by doing this,it looks much better. Wings.I added rivets according to the plan download from the web. Wing blades are replaced by PE one.BTW,the original blade on the wing is wrong for its position. This "Struction".(Sorry,I don't know how to call it in English. ) Every of them is made of these little parts. Finished. Quote Link to post Share on other sites
haneto Posted August 30, 2006 Author Share Posted August 30, 2006 Fins.Panel lines deepened+Rivets added+Details added. Left one. The antenna,like a fan. Right one. For both sides. Struction under the stabilizers. And at last,I changed the assembling method of wings. They were originally one part,so I cut they into two for the conviniece of sanding the fuselage. And brass rods were applied in the middle. Quote Link to post Share on other sites
haneto Posted August 30, 2006 Author Share Posted August 30, 2006 And these are the references I used during my building.Hope they'll be helpful to you,too. Plans: http://www.airwar.ru/other/draw/mig31.html And photos of the real bird: http://www.b-domke.de/AviationImages/Foxhound.html http://www.aircraftresourcecenter.com/AWA1...-31/walk293.htm http://walkarounds.airforce.ru/avia/rus/mig/mig-31/index.htm http://walkarounds.airforce.ru/avia/rus/mi...-31_2/index.htm http://www.lindenhillimports.com/mig-31.htm http://www.lindenhillimports.com/mig-31part2.htm And additional references is extremely welcomed. Quote Link to post Share on other sites
dragonfly Posted August 30, 2006 Share Posted August 30, 2006 Man...that's some quality work there. I'm amazed at how you make those small parts. No way with my sausage-like fingers. Great job. Can't wait to see more. Jerry Quote Link to post Share on other sites
dknights Posted August 30, 2006 Share Posted August 30, 2006 That is nice work. You really have an eye for detail. The PE wing fences are very nice. Did they come from a set, or did you fashion them out of left over PE stock? Quote Link to post Share on other sites
Ivan86 Posted August 30, 2006 Share Posted August 30, 2006 Keep up the good work man Quote Link to post Share on other sites
janman Posted August 30, 2006 Share Posted August 30, 2006 Seeing your work, I begun to question my build on the same kit. It (the Zvezda kit) works OOB, but I should have at least trimmed down the wing edges etc. Quote Link to post Share on other sites
AnthonyWan Posted August 30, 2006 Share Posted August 30, 2006 How big is this thing again? :D Great job on the flap acutators :huh: Quote Link to post Share on other sites
haneto Posted August 31, 2006 Author Share Posted August 31, 2006 Man...that's some quality work there. I'm amazed at how you make those small parts. No way with my sausage-like fingers. Great job. Can't wait to see more.Jerry My fingers are as big as yours,but I use tweezers instead. :blink: As a matter of fact,I majorly built 1/700 waterline warship models at first,so tiny parts are not difficult to me,especially which are for aircraft models. That is nice work. You really have an eye for detail. The PE wing fences are very nice. Did they come from a set, or did you fashion them out of left over PE stock? Hi,David. They are all from Part PE sets. Quote Link to post Share on other sites
joachim Posted August 31, 2006 Share Posted August 31, 2006 Wooow, this is the master at work !!!!!!!!!!!!!!! Quote Link to post Share on other sites
Zmey Smirnoff Posted August 31, 2006 Share Posted August 31, 2006 Absolutely beautiful. Press on! Quote Link to post Share on other sites
haneto Posted September 13, 2006 Author Share Posted September 13, 2006 Hi,guys!I'm back with some new progress. I've been quite busy with my job these weeks so no great progress archieved. :blink: As the glass area on canopy of MiG-31 is too small,I'm afraid nothing can be sighted if I close the canopies. But I don't want them open,either.Because all of my 1/72 jets are all with closed canopies and I greatly enjoy the beautiful lines of these beasts. So I tried to make it movable,just like the real thing. First of all,air-brush the canopies with clear light brown from inside.I mixed the colour by Clear Orange and Snoke Grey,both from Gunze Sangyo. The active canopy.As the thickness will bother the angel to open,so I used a electrci drill to make it dent. Then drill through the joints by 0.2mm,and apply a 0.2mm brass rod.Do NOT cement it! The next canopy which shoule be unmovabel.Drill a ditch in the center of the joint. Then put the brass rod in and cement.So it can move now! As the inside of canopies has been air-brushed,I had to mask both outside and inside to get a correct inside colour. The most difficult point comes.The hydraulic arm which controls the movement of canopies. I took a 0.2mm brass rod.Make the top flat by a vice,then drill a hole. Then drill a 0.2mm hole inside the canopy,cement a 0.2mm brass rod. Apply the drilled brass rod,covered by a plastic plate with 0.2mm hole drilled.Then cement the plastic plate and the support brass rod.So that the brass rod can move freely. And 4 set of the brass pipe was applied in the cockpit,beside the K-36 seats.(Sorry I forgot to take photos of this progress) Quote Link to post Share on other sites

Recommended Posts
Join the conversation
You can post now and register later. If you have an account, sign in now to post with your account.