

Janissary
-
Content Count
2,092 -
Joined
-
Last visited


-
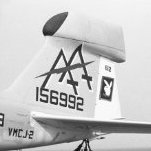
Really beautiful. Your photography is awesome as well. I have never been into the extended wings and catapult kneel with Tamiya's late A kits, but yours looks very attractive. I too have plans for a lowviz A+ from Saratoga. I actually happened to see one in person, but from a distance in 1990! About the AB decal set: Could you let us know if the gray arrow head tail flash is from the decals set or was that masked from Silhouette? I would love to gather as much as I can for my build. I am very much interested in any leftovers you may have from the AB set, and the silhouette files you have cre
-
Thank you. That is extremely useful. I understand why out of three, two's got to be forward. I am leaning toward what you suggested for the wings, though I may keep the centerline empty or with a MER. Would that be legal? I think I have seen a few Alphas with a centerline MER, just loved the look of it. Fascinating to hear that you were with the Sluggers! The story behind my build is that I actually saw several of these jets during the fall of ’90. Saratoga was in the Med, headed toward the Suez (and you were apparently on it!). It stopped at various ports in Turkey—Antalya and I
-
Learning so much from this thread and a few similar ones, thank you. I am currently working on a 1/48 HB A-6E Tram. It will be a VA-35 modex 505 out of Saratoga during the early stages of ODS. Here is a pic of what I am going for (taken from https://www.dstorm.eu/pages/en/usa/a-6.html and is David F. Brown's photo): I love the perforated brakes, which was somewhat rare at that point! I am deciding the load out. I would like MERs, drop tanks, Mk.20s and Mk.82s only. I don't want a 'full MER' load out, but what I have in mind: - Centerline: An empty MER
-
Unfortunately, the above photos did not come out as good as I thought they would. All the surface details got lost in the black and shiny backdrop, and I simply didn't dial in the right exposure. I decided to take another but shorter round of photos, this time in a light box and a gray poster paper as the backdrop. I think these are marginally better, but just wanted to share them for completeness.
-
Thank you!
-
Thank you very much! It was a fun build.
-
-
This is an older model I built last year, but had decided to have the final photos in the WIP thread: Just so that I have all my builds logged in the critique corner, I just decided to reshape those final photos here (so you probably have seen these before):
-
😄 I see that! Thank you Dutch! Just done with this one. Here are the final photos:
-
-
-
Final photos of my 1/48 Trumpeter J-10C! I built this for a friend who wanted it all clean and kempt, which meant a whole a lot of restraint on weathering. I was expecting a dud of a kit but it was not bad after all. No aftermarket resin. I deepened all panel lines and rivets, and added a few scratch-built details to the cockpit. Added a bit of surface detail around the exhaust also. Here is the WIP thread: Base colors are H308 (top) and XF-80 (bottom). Post-shading done with lighter and darker tones of the base colors. I got a bit of silvering on the few early decals
-
Thank you! Almost there! A few pieces at the bottom and should be done. Hope to have a proper background and lighting for the final pics in a few days!
-
-
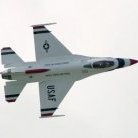
A bit more work. Masking got tedious toward the end but not difficult. Clear film is parafilm. Pink putty is silly putty. There were close to 200 tiny decals that took some time. My first time using Mr. mark setter and I love it. The hawk head was not a part of this hi-viz scheme but it was too cool to pass.
