

Sebastijan
-
Content Count
6,015 -
Joined
-
Last visited
3 Followers


About Sebastijan
-
Rank
Raptor Killer

- Birthday 08/31/1977
Recent Profile Visitors
30,235 profile views


-
lurking around
-
 Using a little bit of Payne's grey oil paint as a filter over DGG parts of Quinta's US aircraft panels, will darken the lighter grey shade of the decal in a way you won't see the difference between the painted part and decal.
 -
Thank you, guys!
-
DreamModel kit, only aftermarket Eduard GBU-49 and Reedoak pilots. Full article with back story and photos of the real birds I took this June: https://vvsmodelling.com/2025/11/04/mirage-2000d-ec-1-30-30-jw/
-
awesome job!
-
Great job! Please describe how you did the missile plume and smoke.
-
Nice project! Looking forward to next updates. Just got GWH Slovak Tiger kit today and it is BEAUTIFUL! Hope to find some time to start building it ASAP!
-
Oh thank you very much for the info - I wasn't aware of the blisters - quick photo check confirmed what you say.
-
Would love to build a Greek AUP F-4E - did Finemolds at any time announced that one? Is it possible to build one from any of the boxes? I guess I could scratch the bird slicers on the nose and fiddle with the instrument panel details but not sure how to tackle those intake (ECM?) pods, that are standard on Naval versions?
-
I've got some of Chris's Draken parts and they are 3d printed high quality stuff. Also met the guy in Moson last month - nice chap! Here's the address: https://www.wolf3dresinparts.at/
-
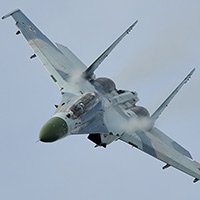
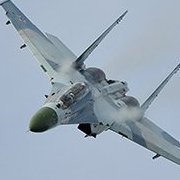
Traffic grey is suitable for refurbished and upgraded BMs and has a blue tone to it. For earlier 31s I guess MRP-354 Grey would more suitable. As for the weathering - you won't see rust, unless looking at some derelict or open air museum planes. What you will see is paint fading (Russians don't put their aircraft in hangars/shelters and so exposure to the elements does its thing. You will see some chipping here and there (I noticed interesting chips on 31s of the dark grey dielectric panels) and hydraulic fluid streaks, especially in the engines area and around whe
-
Here she is completed. You can see the in progress thread in the In progress forums. For full article and gallery, you can check my site: https://vvsmodelling.com/2025/03/14/messerschmitt-me-163-b1-komet/
-
Gaspatch 1:72 Me-163B Komet (3d printed)
Sebastijan replied to Sebastijan's topic in In-Progress Pics
Thank you, indeed it is! When shoot hits the fan. One of the negative sides of 3d printed models is the brittleness of the material. It is very fragile and I have cracked these parts before, while holding the model. However I managed to glue it back and blend it in without a problem. However, during the final steps of the assembly, the model slipped and hit the edge of the desk breaking away the rear part of the aircraft. Oh the frustration. But I knew one thing - if I am gonna recover from this, I have to fix it immediately, while the rage inside me was still ho -
Gaspatch 1:72 Me-163B Komet (3d printed)
Sebastijan replied to Sebastijan's topic in In-Progress Pics
thank you! -
Gaspatch 1:72 Me-163B Komet (3d printed)
Sebastijan replied to Sebastijan's topic in In-Progress Pics
Vacation only a warm distant memory, I finally managed to snap some modelling time. The landing gear was assembled without much problems and the model was given a coat of VMS Satin varnish to unify the work so far, protect the decals and prepare the surface for some light weathering to be done next. The wooden inner part of the skid can be seen from some angles and adds a nice contrasting touch of colour to the model.